How to hide partition recovery and reserved partition system in Windows 10
Many computer manufacturers add a recovery partition to a computer, and this disk can appear in this PC or in some other place on your computer, so many people are searching for how to hide partition recovery in Windows 10 as the average user will not need frequent. There are many ways that you can hide Partition Recovery, book a partition, and any other disk on your device, and we will give you in this topic an explanation of the best of these methods with an explanation of the steps in the pictures.
Hide partition recovery with Disk Management:
The following methods will enable you to hide partition recovery from appearing on your device, but it will still be visible to disk management tools but you will never find it in File Explorer or in various desktop applications, and you can also replay it anytime in the future.
Turn on Disk Management on Windows 10 or 7:
For the Partition Recovery hide method, this will be done through the Windows Disk Management tool, which you can access by right-clicking the Start icon (or clicking the Windows + X buttons) and then choosing Disk Management in Windows 10.
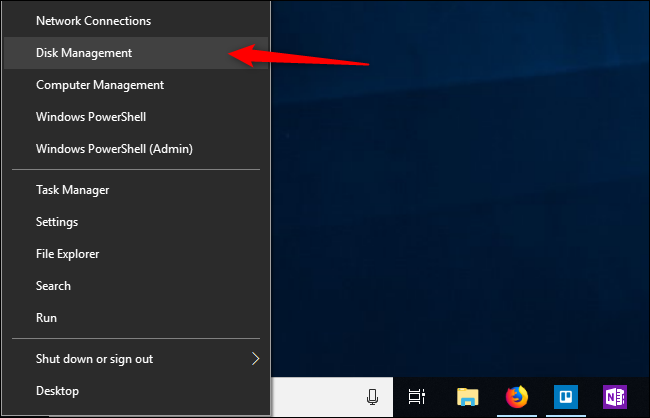
If you’re using Windows 7, you can open Disk Management by searching the Start menu for your hard disk and then choosing to create and format hard disk partitions with results.
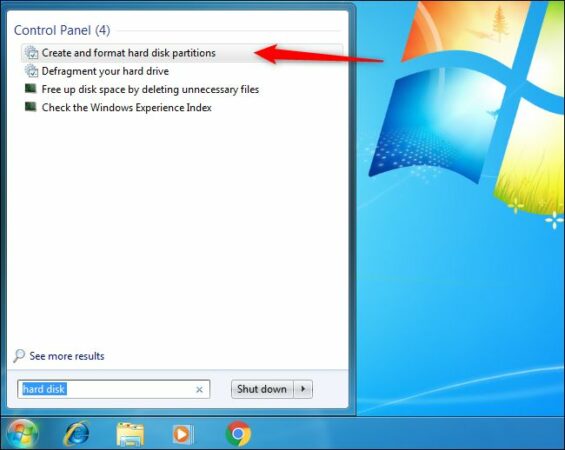
You can also access Disk Management on Windows 7 through the boot window, which you can run by pressing Windows + R buttons, then enter the command “disk mgmt. MSC” and press Enter to open the Disk Management window. After this is done, the rest of the steps below can be followed.
Hide any partitions on Windows with Disk Management:
Now that Disk Management has entered your Windows machine, follow these steps to be able to hide the Partition Recovery system and the fully booked partition system:
- First, you have to select the disk you want to hide on your device. For example, if you want to hide disk “D”, choose it from the volume partition in the Disk Management window.
- Click on the disk you choose with the right mouse button and choose “Change drive letter and tracks” from the menu.
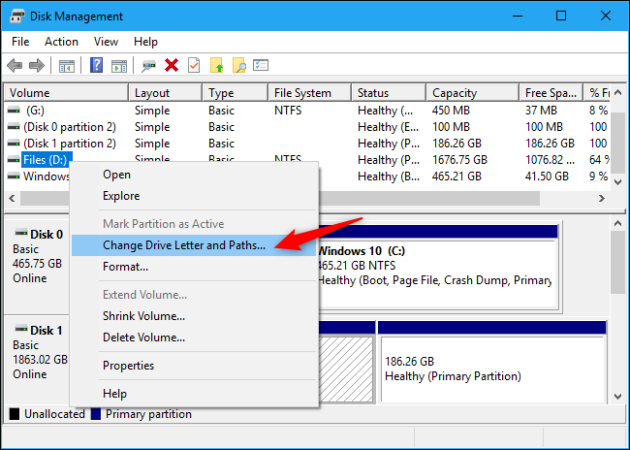
- In the new window that appears, choose the disk you want to hide, click Remove, then press OK.
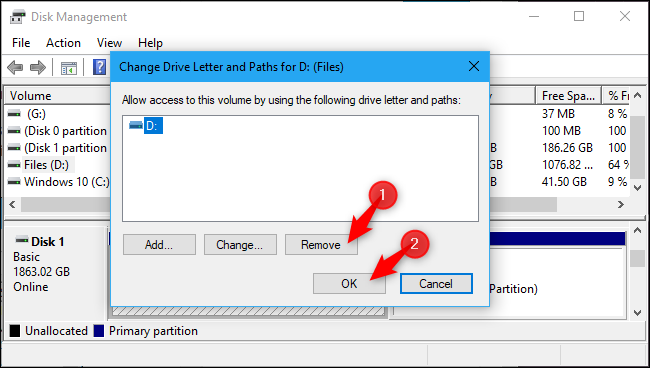
- Generally, each partition contains only one letter for it, and if the partition contains many letters for the tablets assigned to it, you will need to remove each of them from here.
- You will now notice a Windows warning message stating that programs may not run correctly when hiding a disk, for example, if you store any files on this disk or install programs on it, you will not be able to access these files because the disk is hidden, so click ” Yes “in this message to continue.
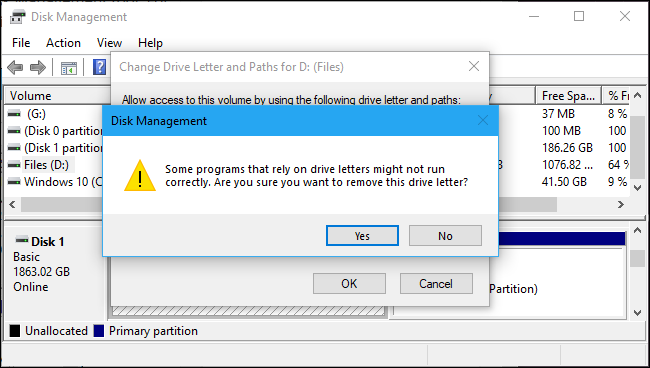
- You may also receive a message stating that you must restart the computer if the required part is currently used, so press Yes again and restart the computer to complete the process.
- You will now notice that Partition Recovery is completely hidden from your device and you will not find it again in File Explorer or on desktop software.
Show Partition Recovery again
In the future, you may need to return to the recovery section or the partition that you have previously hidden. To do this, you’ll need to do a few simple steps as follows:
- Enter Disk Management again.
- Right-click on the parachute you previously are hidden and choose Change drive letter and paths.
- Now click on Add to add a letter to the disk, and you must add the letter that was previously (before hiding it).
- This way, you will notice the partition appear again, and it should work properly and without any .problems
Conclusion :
These were the most prominent ways in which you can hide the Partition Recovery and Partition System system reserved in Windows 10, and you can also use it to hide any other partition on your device. After performing the previous steps, you will notice that the partition has been completely hidden from File Explorer, but it will still be visible to Disk Tools Manager.


