How to shoot screen Windows 10
How to shoot computer screen works on Windows 7, 8, 8.1 and 10 with one click,
By applying some steps, you will be able to take a screenshot of the computer, through the keyboard,
Without the need to search for a program specialized in it.
There are two ways to shoot a computer screen,
the first way is through the keyboard,
The second way through a tool is found in Windows 10, Windows 7, and Windows 8 ،
” Snipping Tool “
Screen capture from the keyboard
- Click the Windows tab on the keyboard + Print Screen, PrntScr, or Prt Sc button
- A screenshot will be taken and saved to the Windows image file
Another way, with your computer keyboard, is simple,
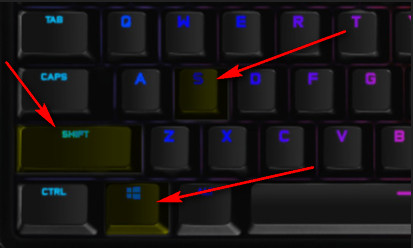
You can take a screenshot of your computer by clicking on the Windows logo + Shift + s .
Take a screenshot using Snipping Tool

You can also use the “Snipping Tool”
Built in default in the Windows system, which enables you to capture the screen and adjust the images,
To operate and use this tool, follow the next steps :
- From the start menu, search for “Snipping Tool”
- Click “NEW” and select the part you want to shoot
- You get a computer screen image that can be modified via the tool
Snipping Tool
Some other advantages:
- Drawing on photos
- Writing on the images
- Photo editing
- The tool provides the option of a photo printer
- And more.
